Upper limb neurological examination
Click the button to download our free OSCE Book
Key Message
In a neurological exam, the key aspect of the exam is to work out where the nerve lesion is occuring. There are mainly 4 locations of lesion, each which give a particular pattern of clinical signs. Understanding these patterns will help you ace the exam each time and help to understand why the patient has particular symptoms. The 4 main types of presentations you are likely to see in your exams are:
| UMN | LMN | Parkinson’s | Cerebellar | |
| Tone | Up | Down | Up | Normal |
| Power | Low | Low | Normal/Low | Low |
| Reflexes | Brisk | Reduced | Normal | Normal |
| Coordination | Normal | Normal | Normal | Poor |
| Sensation | Variable | Variable | Normal | Normal |
Introduction
- Wash Your hands
- Introduce yourself by name and Role
- Check the patient’s identity – name and Date of Birth
- Explain the procedure – why you need to do it and what does it involve
- Ask for consent
- Expose the patient appropriately
- Check if the patient is currently in any pain
- Ask if they are right or left-handed
How to Introduce Yourself
“Good morning, my name is .. and I am a medical student. Can I just check your name and date of birth?
I have been asked to do an examination of the nerves in your arms today. This will involve me having a look and then testing the movement and sensation of your arms. Is that ok?
– For the purposes of this examination would you mind removing your shirt please?
– Before I start, can I just check whether you are in any pain?
– And are you right or left handed?”
Bedside Inspection
- Observe the patient: Patient is A – Alert B – (normal) Body habitus C – Comfortable at rest
- Observe the surroundings: mobility aids (wheelchair, walking stick)
Inspection
Action: Ask the patient to hold out their arms straight. Have a look from all sides, including both axillae.
Assess for: SWIFT-PH
–> Scars: These are indicative of previous surgery or trauma to the arms
–> Wasting: This is what happens to muscles when they lose nervous innervation. It is a clinical sign which is usually associated with a lower motor neurone problem.
–> Involuntary movements: There are a variety of involuntary movements which are associated with specific nervous conditions.
a) Chorea – these are short, unwanted movements which appear in conditions like Huntington’s disease
b) Myoclonus – involuntary twitching of a muscle or a group of muscles, central nervous system disorders
c) Athetosis – slow, involuntary, writhing movements of the fingers, hands, toes. It occurs due to damage of thalamus, basal ganglia, seen in HD and hypoxia infants
d) Pseudoathetosis – abnormal writhing movements, usually of the fingers, caused by a failure proprioception – disruption of the proprioceptive pathway, from nerve to parietal cortex.
–> Fasciculations: These are tiny contractions of skeletal muscle which may look like cramping of the muscle to the naked eye. They are associated with lower motor neurone lesions
–> Tremor: These are defined as fine or course.
–> Posture: Can indicate the curvature of the spine
–> Hypertrophy: This is a clinical sign which is associated with upper motor neurone lesions.
Screening
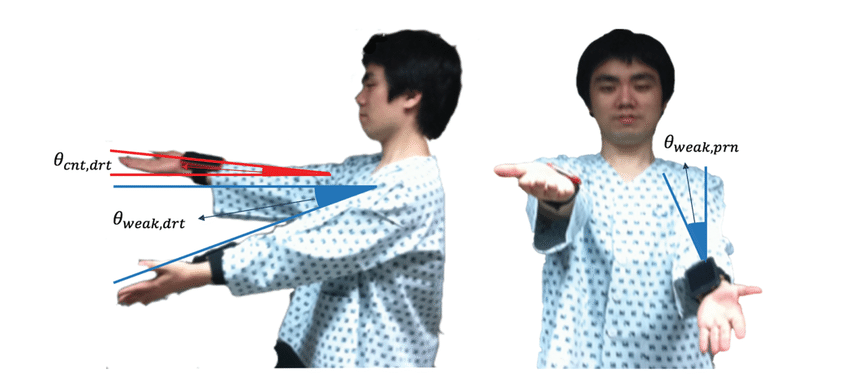
Action: Ask patient to hold out their arms fully extended with their palms facing upwards. Then ask them to close their eyes. Observe them for 30 seconds.
Assess for:
–> Pronator drift: This is a clinical sign whether the arms will start to pronate (turn over) so that the palms face downwards. It occurs in UMN neurone lesions which makes the supinator muscles weaker than the pronator muscles. Signifies a contralateral pyramidal tract lesion.
Tone
Testing the tone is an essential part in helping to distinguish whether the nerve lesion is upper or lower. Upper motor neurone lesions typically give hypertonia, whereas lower motor neurone lesions give reduced muscle tone.
There are 3 main actions that we use to assess tone in the arms.
Action: Ask the patient to fully relax their muscles so you can passively move them. Support their elbow with one hand and with the other hand hold their hand like you are giving them a handshake.
– Shoulder: Extend and flex the shoulder moving the arm towards you and away.
– Elbow: Support the elbow and holding the hand, carry out passive flexion and extension of the elbow.
– Forearm: In same position, with the elbow at 90-degree flexion, pronate and supinate. Repeat this movement again supinating the forearm very quickly to assess for supinator catch.
– Wrist: Ask the patient to make a fist. Hold their fist and use it to flex/extend and rotate the wrist.
Assess for:
–> Hypo/hypertonia: Hypotonia is associated with LMN lesions and hypertonia with UMN lesions.
–> Supinator catch: When supinating the forearm, this is a brief “catch” that you will feel in the movement as you rotate. It is associated with spasticity and so is a UMN sign.
–> Cogwheel rigidity: This is a clinical sign associated with Parkinson’s disease. Here the muscle will move and then get stuck intermittently like a cogwheel. It is velocity independent, meaning it is the same whether you move the muscle quickly or slowly.
–> Leadpipe rigidity: This is a clinical sign where there is increased tone throughout the whole movement of the muscle. It feels like you are trying to move a lead-pipe which is very stiff. It is “velocity-independent” meaning that it is the same whether you move the muscle quickly or slowly. It is seen in neuroleptic malignant syndrome.
–> Spasticity: This is an UMN sign where there is increased muscle tone which makes movements stiff. There is initially higher tone in the muscle as you start the movement which rapidly gives way at a specific point. It is velocity dependent, and gets worse with increase speed of movement.
Power
Many nerve conditions lead to muscular weakness. This can be tested by assessing the power of the muscles. You want to see if the weakness is widespread or has a specific pattern. This can help localise where the nerve lesion is. To test power, it is important that you stabilise and isolate the relevant joint and compare side to side.
For each joint, compare each side to ensure you are testing like for like. You will test the power by providing resistance and asking the patient to push against you.
We measure the power using the MRC scale (0-5):
MRC Power Scale
0= No contraction at all
1 = Flicker of muscle contraction
2 = Can move muscle but not against gravity
3 = Can move muscle against gravity
4 = Movement against gravity and some resistance, but a little weakness remains
5 = Normal power, full movement against gravity and resistance
Shoulder
Action: Ask the patient to put their arms out like a chicken
Assess for:
–> Shoulder Adbuction: Tell the patient to not let you push their arms down.
– Tests deltoid/supraspinatus muscle.
– Nerve roots = C5
–> Shoulder Adduction: Place your hands under the patients arms and ask them to try and push your hands down.
– Tests pectoral muscles
– Nerve roots = C6,C7,C8
Elbow
Action: Ask the patient to put their arms like a boxer in front of them
Assess for:
–> Elbow Extension: Push against the patients arms and ask them to resist you
– Tests triceps muscles
– Nerve roots = C7 (radial nerve)
–> Elbow Flexion: Hold the patients forearms and try to pull their arms out whilst telling the patient, “Don’t let me pull your arms away from you.”
– Tests biceps brachii, brachioradialis
– Nerve roots = C6
Wrist
Action: Ask the patient hold our their arms outstretched and make a fist.
Assess for:
–> Wrist flexion: Ask the patient to flex their wrists. Apply pressure against this and try to extend the patient’s wrist whilst telling the patient, “Don’t let me know push your wrists up.”
– Tests flexor carpi groups
– Nerve roots = C7, C8
–-> Wrist Extension: Ask the patient to cock back their wrists and then try to push their wrists down. Tell the patient, “Don’t let me push your wrists down.”
– Tests Extensor carpi groups
– Nerve roots = C7 (radial nerve)
Fingers
Action: Ask the patient to put their hands out so that their palms are facing downwards and then to splay their fingers.
Assess for:
–> Finger abduction: With your fingers, apply pressure to try and push in the little finger whilst asking the patient to resist you. Then try to push in the index finger
– Tests abductor digiti minimi and interossei
– Nerve root = T1 (ulnar nerve)
If there is a deficiency in T1, you can do Froment’s test:
Action: Place a piece of paper between the patient’s thumb and side of their index finger and ask them to squeeze hard. Try and pull out the piece of paper.
Assess for:
– Weakness: The muscle in question in adductor pollicis which is innervated by the ulnar nerve. An ulnar nerve palse will lead to weakness meaning that the patient has to compensate by using flexor pollicis longus which is supplied by the median nerve. This means they will bend the distal phalanx of the thumb and use thumb flexion, rather than adduction to keep the paper there.

Thumb
Action: Ask the patient to turn their hands over so that their palms are facing upwards, and point their thumbs up.
Assess for:
–> Thumb Abduction: Apply downward pressure on the thumb and ask the patient to resist you.
– Tests abductor pollicis brevis
– Nerve root = T1 (median nerve)
Reflexes
This is a good way to distinguish between upper and lower motor neurone lesions. Remember, UMN give hyperreflexia whereas LMN will produce hyporeflexia. If you cannot elicit a reflex you can ask the patient to clench their teeth. This is known as a Jendrassik manouveure and it helps to accentuate the reflex.
Biceps Reflex
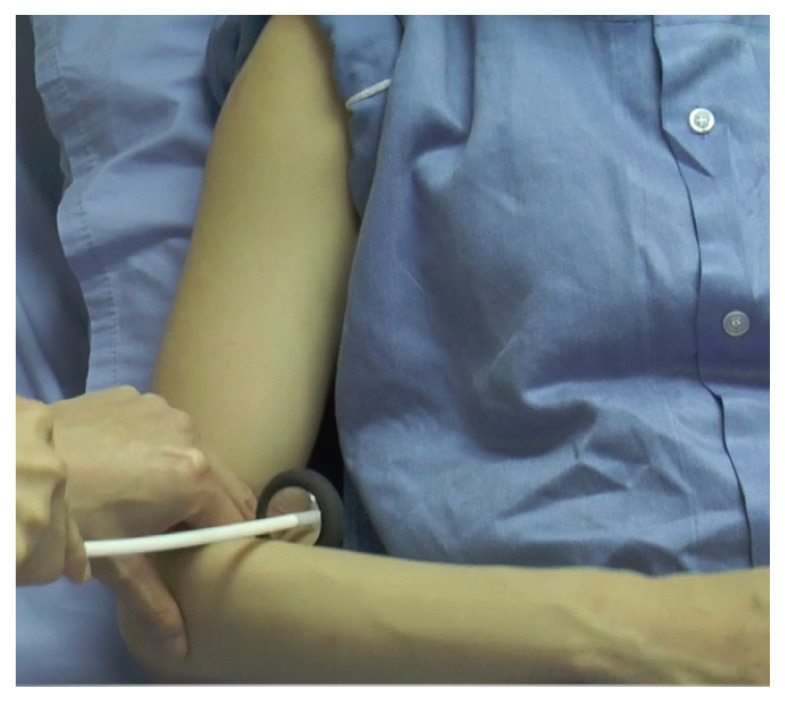
Action: Test the biceps reflex in both arms.
a. Ask the patient to relax their arms and place their arm over relaxed across their body.
b. Feel for the biceps brachii tendon in the antecubital fossa and place your left thumb over it
c. Using the tendon hammer, tap onto your thumb
d. See if you can feel a reflex contraction of the biceps muscle which flexes the elbow.
Assess for:
–> Biceps Flexion: This reflex tests the nerve roots C5/C6. Observe for evidence of both hyporeflexia and hyperreflexia.
Triceps Reflex
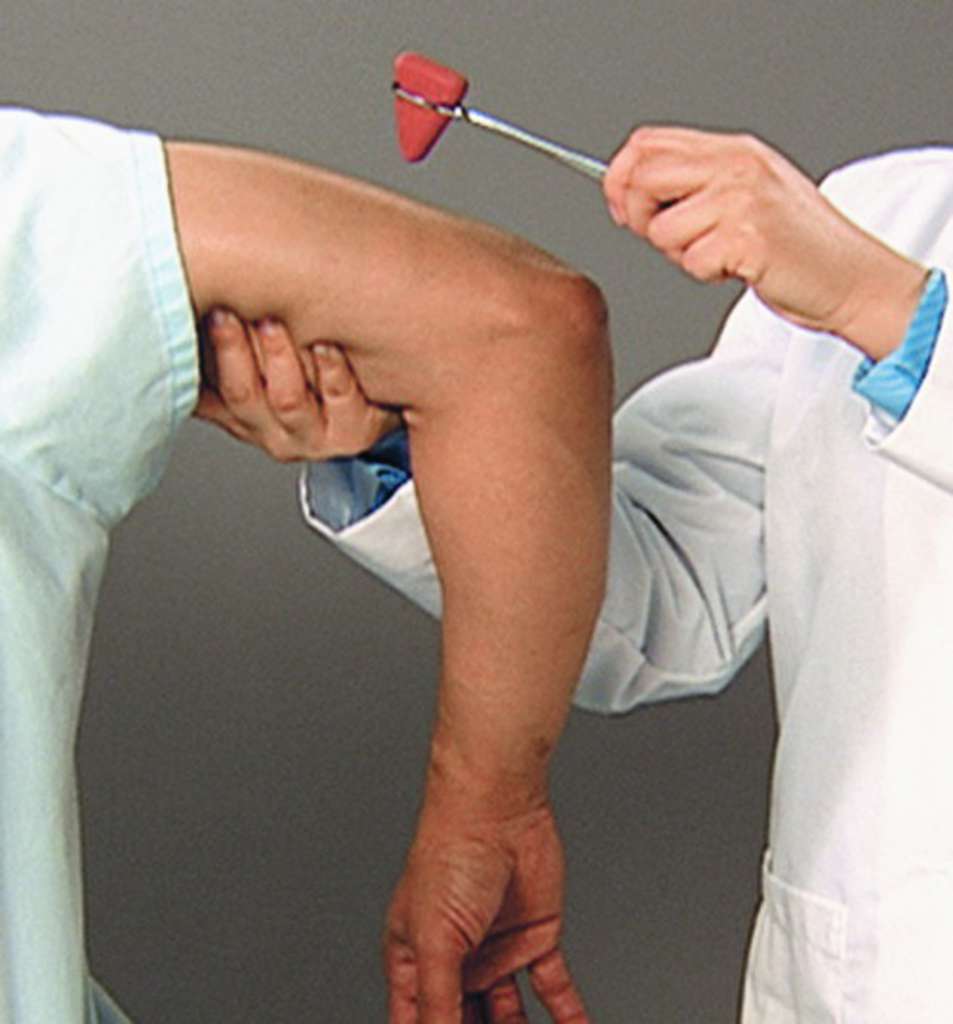
Action: Test for the triceps reflex in both arms, one by one
a. Support the patient’s arm so that the elbow is in 90 degree flexion and feel for the triceps tendon on the posterior aspect of the elbow.
b. Using the tendon hammer, tap the triceps tendon which inserts onto the olecranon of the ulnar
c. You should see a reflex contraction of the triceps which extends the elbow.
Assess for:
–> Hypo/hyperreflexia: LMN associated with hypo and UMN associated with hyper.
Supinator Reflex
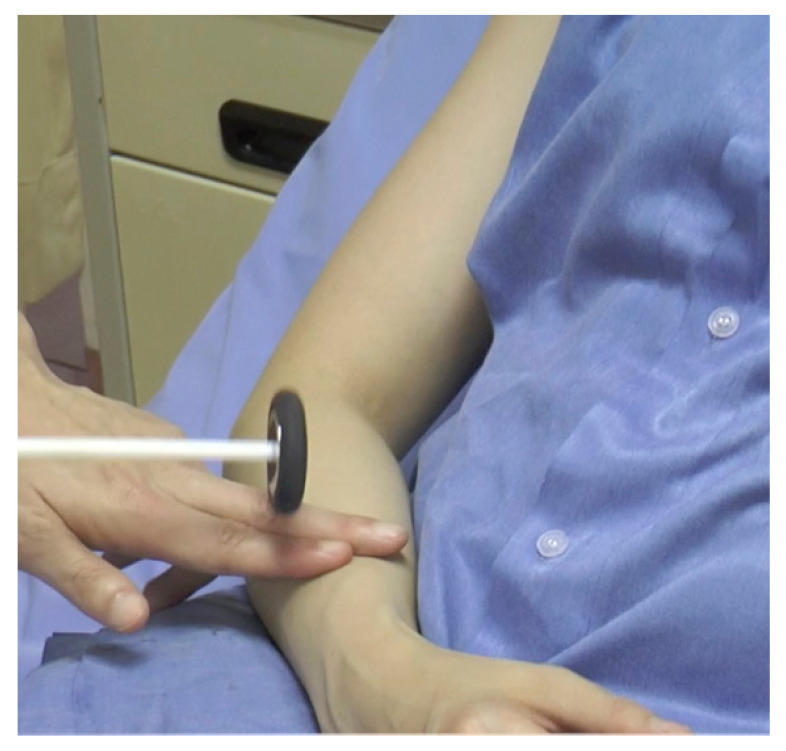
Action: Test the supinator reflex in each of the patient’s arms.
a. Whilst it is called the supinator reflex, you are looking for the brachioradialis tendon which is found on the posterior and lateral aspect of the forearm.
b. Place 2 fingers of your non-dominant hand over this area.
c. Using the tendon hammer, tap over your fingers.
d. Observe for a reflex contraction of the brachioradialis muscle which will cause a twitch in the forearm.
Assess for:
–> Hypo/hyperreflexia: LMN associated with hypo and UMN associated with hyper.
If you suspect an upper motor neurone lesion, you can offer to to test for the Hoffman reflex
Action: loosely hold the patient’s middle finger and flick the fingernail downward
Assess for:
–> Hoffman’s reflex – A positive response is seen when there is flexion and adduction of the thumb on the same hand. It is suggestive of hypertonia/myelopathy which are associated with UMN lesions.
Coordination
Coordination is an important test as it assess the ability of the brain to synchronise the movement of multiple muscle groups. This is usually controlled by the cerebellum. Therefore, an inability to coordinate the muscles usually points to cerebellar ataxia.
N.B. Do keep in mind that patients may not be able to do these movements due to weakness, pain, or an inability to understand your instructions.
Finger nose test
Action: Get the patient to perform the finger nose test
a. Tell the patient to touch their nose with their index finger
b. Now place your finger in front of the patient in a position whether they could stretch their arm to touch it
c. Ask the patient to now touch your finger
d. Ask the patient to touch their nose again and repeat the cycle 3 times. Each time, move your own finger to a new position.
Assess for:
–> Dysmetria: This word means a lack of coordination of muscle groups. Whilst the patient may be able to do the movement really slowly, the key is to assess whether they can do it in a smooth manner or whether they miss the target.
–> Intention Tremor: This is a type of tremor which will get more intense as the patient nears the target (your finger). It is a sign of cerebellar dysfunction.

Disdiadochokinesia
Action: Test for the patient’s ability to make rapid, repetitive movements.
a. Ask the patient to place their right palm out and then put their left palm on top
b. Now ask the patient to turn their left hand over so that back of their left hand is touching their right palm
c. Then ask them to turn it back over to the original position.
d. Ask the patient to repeat these movements as fast as they can.
e. After 10s, repeat the test on the other hand.
Assess for:
–> Disdiadochokinesia: This means an inability to do rapid repetitive movements. In this test, the patient will have slow irregular movements and may stop or get frustrated very quickly. This is a sign of cerebellar dysfunction.

Sensation
Testing for sensation is essential as it can help distinguish whether the condition solely affects motor nerves or whether sensation is also affected. This gives you an idea of the underlying diagnosis e.g. motor neurone disease does not affect sensation.
With sensation, you want to characterise the distribution of sensory changes and compare side to side.
You will also want to test different modalities, including light touch, pain and temperature.
LIGHT TOUCH
Action: Test the sense of light touch using a piece of cotton wool (or lightly tapping)
a. Ask the patient to close their eyes and brush the cotton wool on their sternum. Explain that this is what it will feel like
b. Tell the patient that you will tap them lightly. Ask them to say “Yes” when they can feel something.
c. Brush the cotton wool in the following areas, which are supplied by particular nerves. For each dermatome, compare side by side, and ask “Does it feel the same on both sides?”
| C4 – Shoulder Tip | C8 – Little finger (ulnar nerve) |
| C5 – Lateral arm | T1 – Medial forearm |
| C6 – First web space | T2 – Medial arm |
| C7 – Middle finger |

PAIN
Pain is carried by Ad and C fibres in the spinothalamic tract.
Action: Test for the pain sensation in exactly the same way as testing for soft touch. Instead of cotton wool however, use the sharp end of a neuro-tip.
TEMPERATURE
Temperature is also carried by Ad and C fibres in the spinothalamic tract.
Action: Offer to test for the temperature sensation in exactly the same way as testing for soft touch. Instead of cotton wool however, use a cold or hot stimulus.
– It is unlikely you will be required to test for temperature in an OSCE, but you should still offer the test for bonus points.
Vibration
Vibration and pressure are transmitted by large Aa and Ab fibres which travel in the dorsal column of the spinal cord. They are affected by many conditions, including diabetes.
Action: Test for the sense of vibration using a tuning fork.
a. Tap the tuning fork so it vibrates
b. Ask the patient to close their eyes and place the end of the tuning fork on their sternum, to show them what it will feel like.
c. Tell them you will now place it elsewhere and that they need to tell you when they can feel it vibrating and when it stops.
d. Tap the tuning fork and place the end on the distal interphalangeal joint of their thumb.
e. See if the patient can correctly tell you when it vibrates and when the vibration has stopped.
Assess for:
–> Sense of vibration: If they answer you correctly, you do not need to continue.
– If they cannot answer at the big toe, work more proximal repeating the test at the metacarpophalangeal joint, then wrist and then elbow.
Proprioception
Proprioception is the sense of where you limbs are in space. It relied on joint fibres which gives sensory input to the brain allowing the brain to form an image of the body in space. It is affected by neuropathies which affect nerve fibres which travel in the dorsal column of the spinal cord.
Action:
a. Hold the patient’s thumb by the distal phalangeal joint on both sides (not compressing the nail bed).
b. With the patient watching , move the thumb “up” and then “down” so the patient understands which way is which.
c. Ask the patient to close their eyes
d. Move the toe up and down, each time asking the patient which way you are moving it.
Assess for:
–> Sense of proprioception: If they answer you correctly, you do not need to continue.
– If they cannot answer at the big toe, work more proximal repeating the test at the metacarpophalangeal joint, then write and then elbow.
Thank the patient and wash your hands again!
On Completion
“To complete the examination, I would do a number of steps…”
Bedside
- (History) Take a full history including effects on life and functional status
- (Observations) Full set of observations
- (Corresponding examination) Conduct a neurological assessment of lower limbs and cranial nerves. Offer a full assessment of cognitive and higher order functions like speech
Bloods – FBC, inflammatory markers, renal profile etc.
Imaging – CT scan/MRI scan (if indicated)
Special Tests – Nerve conduction studies/EMG (if indicated)
Sources
Pronator Drift – Use of Machine Leaning Classifiers and Sensor Data to Detect Neurological Deficit in Stroke Patients – Scientific Figure on ResearchGate. Available from: https://www.researchgate.net/figure/The-pronator-drift-test-a-the-degree-of-drift-in-the-weak-arm-and-counter-arm-of-a_fig2_316354616
Froment’s Test – https://www.pinterest.co.uk/pin/94575660900210934/
Biceps Reflex – Malays J Med Sci. 2021 Apr; 28(2): 48–62. Published online 2021 Apr 21. doi: 10.21315/mjms2021.28.2.5. Copyright © Penerbit Universiti Sains Malaysia, 2021. This work is licensed under the terms of the Creative Commons Attribution (CC BY) (http://creativecommons.org/licenses/by/4.0/).
Triceps Reflex – Triceps reflex test (Seidel et al, 2011) http://medical-dictionary.thefreedictionary.com/_/viewer.aspx?path=MosbyMD&name=triceps-reflex.jpg&url=http%3A%2F%2Fmedical-dictionary.thefreedictionary.com%2Ftriceps%2Breflex
Supinator Reflex – Malays J Med Sci. 2021 Apr; 28(2): 48–62. Published online 2021 Apr 21. doi: 10.21315/mjms2021.28.2.5. Copyright © Penerbit Universiti Sains Malaysia, https://clinicalgate.com/coordination-2/#F0010. This work is licensed under the terms of the Creative Commons Attribution (CC BY) (http://creativecommons.org/licenses/by/4.0/).
Finger Nose Test – https://clinicalgate.com/coordination-2/#F0010
Dysdiadochokniesia – Evan-Amos, CC BY-SA 3.0 <https://creativecommons.org/licenses/by-sa/3.0>, via Wikimedia Commons
Dermatomes – Anatomy, Skin, Dermatomes Copyright © 2021, StatPearls Publishing LLC. Public Domain
Disclaimer
