Chest X-Ray
Interpreting a Chest X-Ray is an essential skill for any junior doctor. Therefore, to help you learn this skill, you can use the following acronym DR ABCDE.
By using this, you will be able to go through chest X-Rays in a systematic way to ensure you don’t miss any important details. It also gives you a great structure when you need to present the findings to your senior.

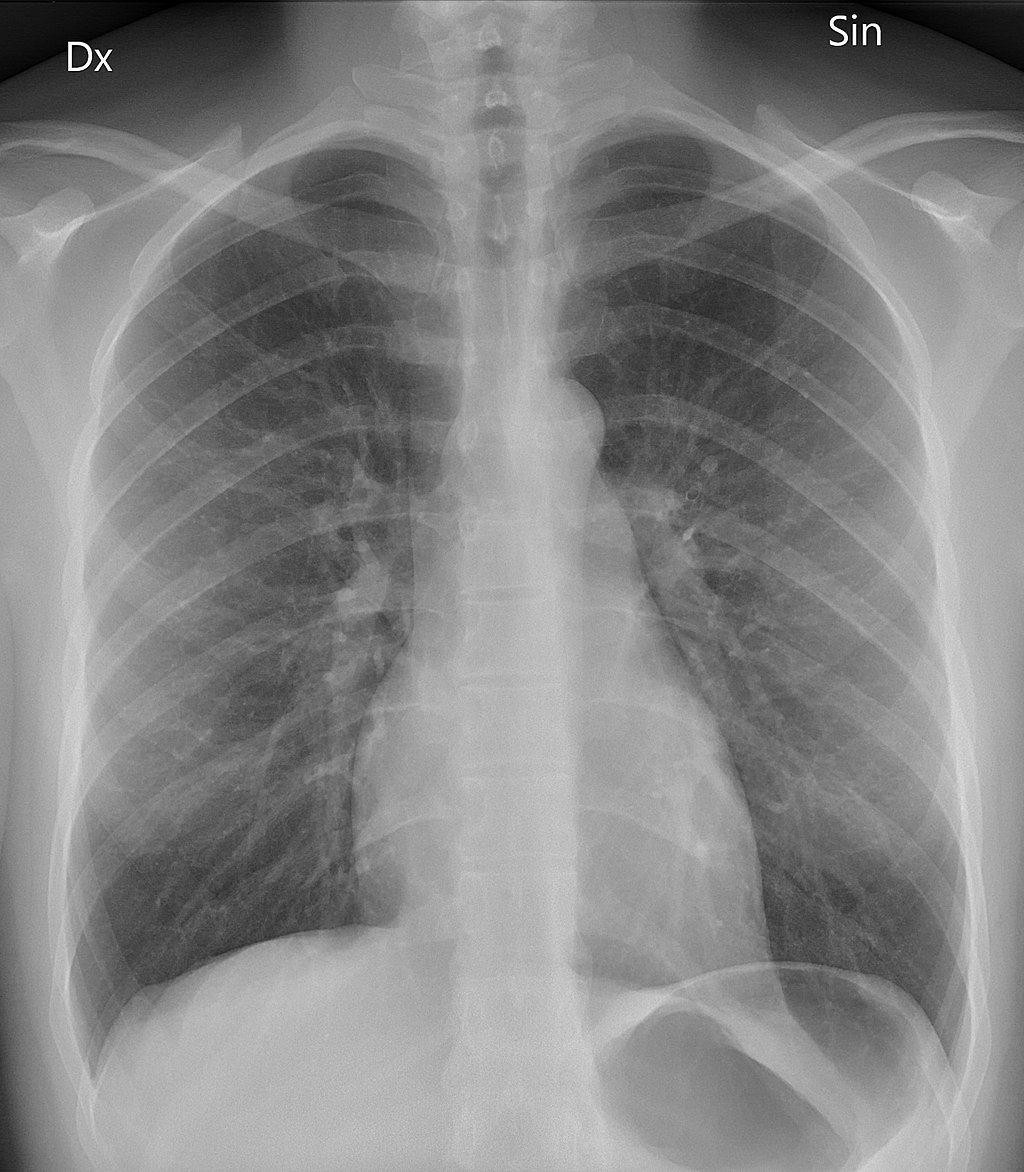
So if you are presented with a CXR like this, let’s see how to go through it.
D – Details
When starting with any chest X-Ray, the first thing to do is to confirm that it is of the right patient. This will involve checking for the following features.
- Confirm Name
- Confirm Age
- Confirm DoB
- Confirm Date and Time of Film
- “Is there anything I can compare the film to?”
Many patient’s who have prolonged admissions or a background of respiratory disease may have chronic CXR changes. Therefore it is important to always ask whether there is a previous CXR that you can compare to. This will help to identify whether any abnormality is longstanding or chronic.
R – RIPE
This is a sub-mnemonic. After you have confirmed that the CXR is for the correct patient, you should then comment on the film quality.
This involves mentioning 4 key features: Rotation, Inspiration, Projection and Exposure.
R - Rotation
- Medial parts of clavicles should be horizontal and equidistant from spinous processes – if closer to one clavicle then rotated towards that side
- Spinous processes should be vertical against vertebral bodies
I - Inspiration
- 5 – 6 anterior ribs should be present
- Both costophrenic angles should be present
- Apices should be present
P - Projection
- The standard way to do a chest x-ray is PA (posterior anterior). This means that the plate is held in front of the patient and the X-Ray beam is aimed from behind them.
- The CXR will usually state if it is taken PA or AP. As PA is the norm, if there is nothing written, then you can assume that it is taken PA
- If patient’s are unable to stand, then this is a time when it might be taken AP. Therefore, an anterior-posterior X-Ray is an indication that the patient may not be very mobile and so it more likely to be sick.
- The problem will PA X-Rays is that due to dispersion, the heart may appear larger than it is. Therefore, you will not be able to comment on the size of the heart and say that there is cardiomegaly present, as this might just be due to the projection of the chest X-Ray
E - Exposure
- Exposure is how well you can see the structures.
- You should be able to see the vertebral bodies visible behind the heart. This is a well exposed X-Ray
- If you cannot see the vertebrae, this is underexposed and means you could miss key pathology
A – Airways
Now that you have confirmed patient details and commented on the film quality, you can start going through the Chest X-Ray systematically.
The first part of the acronym (A) focusses on the airways. This involves looking at the trachea (to see if it is deviated) and then the carina and bronchi.
Tracheal Deviation
In a healthy patient the trachea should be in the middle between the two lungs and not deviated. Tracheal deviation signifies that either something is pulling the trachea in one direction or pushing it away from something. It is important to look at the direction the trachea is deviated in consideration with where the opacification is seen in the lungs:
- Deviated away from opacification (white): Large pleural effusion, thoracic mass
- Deviated towards opacification: Collapse, pneumonectomy
- Deviated away from black area: Tension pneumothorax
- Central trachea: Seen in conditions like consolidation (pneumonia/oedema), pleural effusion, pneumothorax, fibrosis
Carina and Bronchi
The carina is located at T4/T5. It is an important landmark for assessing whether an NG tube is placed correctly. A correctly placed NG tube should bisect the carina on CXR. This suggest that the NG tube is in the oesophagus and not in the airways.
Once you have seen the trachea, you can follow the bronchi into the lungs and assess for any masses.
B – Breathing
This section is arguably the most important part of your CXR analysis. It involves looking at the lung tissue, which is what takes up most of the space on a CXR.
As the lung tissue, is so big, we suggest you start by looking at the pleura for a pneumothorax, followed by detailed analysis of the lung zones and finally the hila. This will ensure you are not missing anything important.
Pleura (pneumothorax)
Scan the edges of the lungs and assess if the lung markings go all the way to the edge of the thorax. In healthy individuals, the intrapleural space should not be visible as the lungs are fully expanded and there is no air in the space.
If there is air in the pleural space, then you will be able to see increased lucency (blackness) and the white lung markings will not go all the way to the costal margins. This indicates that there is a pneumothorax.
Lung Zones
Divide R and L lungs into upper, middle and lower zones and Inspect each zone in turn looking for asymmetry. You will be looking to find areas of opacification.
Opacification (increased white) can be due to a variety of pathologies. It can be due to a mass (tumour). Often it is due to infection, where inflammation caused pus and nectrotic debris to clog up the airways. This is more dense than air and so appears whiter on X-Rays.
Upper/Apex:
- Check lung markings extend to the end – pneumothorax and
- Check for apical opacification – Pancoast tumour, apical fibrosis seen in ankolysing spondylitis
Middle and lower zones:
- Check for opacification that maps to lobes – indicates lobar pneumonia, collapse or is diffuse
- Bilateral opacification is seen in conditions like pulmonary oedema, bronchial pneumonia
- Check for isolated spots of opacification – these may show tumours (cancer), granulomas (TB), pulmonary haemorrhages (seen in Wegener’s GoodPastures syndrome)
Hila
The hilum is an important structure that contains pulmonary vessels and lymph nodes. The hilum is usually not prominently visible on a CXR in healthy indivuals. Increased hilar opacification is associated with several conditions
Unilateral hilar opacification: Lung cancer, lymphoma, early TB
Bilateral hilar opacification: TB, Sarcoidosis, Lung cancer, lymphoma
C – Cardiac
A chest X-Ray is not the most sensitive investigation for looking at heart function. This is usually done with an echocardiogram or a cardiac MRI.
However, even on a CXR, you will be able to spot gross abnormalities associated with the heart and surrounding vascular structures. This includes conditions like heart failure, and aortic aneurysm/dissection.
Heart Size
• If Anterior-Posterior projection, then you cannot comment on size
• If Posterior-Anterior film, then heart should be less than half the width of the thorax. If the heart is larger than this, this signifies caridomegaly (an enlarged heart). This often occurs secondary to heart failure, pulmonary hypertension and pericardial effusions
Heart Borders
Looking for the heart borders helps to identify any consolidation that might be affecting the lungs. This is because consolidation here will cause loss of the heart border definition, as the white from the consolidation merges with the increased opacification due to the heart muscle.
• The right atrium makes up the right heart border. Loss of right heart border definition = Right middle lobe consolidation
• Left ventricle makes up left heart border. Loss of left heart border definition = Left lingual consolidation
Mediastinum
You can look at the mediastinum to identify any gross pathologies. These include:
Aortic dissection – this shows up as a widened mediastinum on CXR
Hiatus hernia – this is when part of the stomach herniates into the thorax through the diaphragm. It will be seen behind the heart
D – Diaphragm
The diaphragm is one of the most important features to look at on a Chest X-ray. When looking at the diaphragm, you should compare between the right and the left side to see if one side is more raised than the other.
In addition, you should assess the costophrenic angles as well as looking for free air under the diaphragm.
Left and Right Hemidiaphragm
In a normal patient, the right and left hemidiaphragms should be clearly visible as two domes. The right side is often a little bit higher than the left as it is pushed upwards by the liver. When analysing the hemidiaphrgams, look out for the following features:
- Flattened hemidiaphragms – seen in COPD due to hyperexpanded lungs
- Opacification against the diagphrams – seen in lower lobe pneumonia
- Raised hemidiaphragm – seen in lung collapse, lung removal surgery (pneumonectomy)
Free Gas
Gas under diaphragm suggests pneumoperitoneum, air in the peritoneum. This is serious as it is suggestive of bowel perofration, causing gas to rise and collect under the diaphragm.
On the left side, you may also see a gas bubble. It is important to realise that a gas bubble in the stomach is a normal finding
Costophrenic Angles
The costophrenic angles are the part at the edges where the diaphragm meets the costal margin. They should be clearly visible in a health individual. Look out for blunting of the angles – as this is associated with pleural effusions and consolidation.
Pleural effusions can be unilateral or bilateral:
- Unilateral ones are often due to exudative processes e.g. parapneumonic, secondary to malignancy
- Bilateral are often due to transudates caused by increased hydrostatic or reduced oncotic pressure e.g. heart failure, liver failure, renal failure
E – Everything Else
The E in the acronym stands for everything else. Here is it important to check for additional features not directly related to the lungs.
This includes the bones as well as any foreign objects e.g. foreign bodies, pacemakers, central lines etc.
Bones
If you see a pneumonthorax, remember that this could be caused by a rib fracture
Foreign Objects
This involves checking for a variety of different things. These are very easily identifiable on a chest X-Ray as they are usually radio-opaque and give a big indication of the underlying pathology present.
- ECG electrodes
- Pacemakers
- PICC lines
- Chest drains
- NG tubes
Review Areas
Before you end your analysis, it is recommended to review 4 areas. This is because there are 4 of the most common places where pathology is missed in a Chest X-Ray. This is often because changes here may be very subtle, and you will easily miss them unless you speficially concentrate on these areas. The 4 areas are.
• Apices
• Hila
• Pleura
• Retrocardiac (behind the heart)
Example
Now that we know how to systematically go through a CXR, let’s have a look at how we would interpret the CXR we saw at the beginning.

CXR Interpretation
D – This is a Chest X-Ray taken on ….., of the following patient….. Is there a previous CXR to compare to
R – Commenting first on the quality, it is not rotated, there is adequate inspiration, the projection is posterior-anterior and it is adequately exposed as I can see the vertebral bodies clearly
On initial inspection, there is no obvious pathology, but I will proceed to go through it systematically.
A – Starting with the airways, the trachea is not deviated, and the carina is visible.
B – The pleural markings go all the way to the costal margin so there is no evidence of a pneumothorax. Going through the lung zones, there is no area of increased opacification and both hila appear normal.
C – The heart is not enlarged and the borders are clearly visible.
D – The hemidiaphragms are clearly visible and there is no blunting of the costophrenic angles. There is no free air under the diaphragm.
E – There are no foreign objects or bone fractures.
There is no abnormality in the review areas, including the apices, behind the lung
In summary this is a normal chest X-Ray
Check out the following pages to see more examples of common pathologies seen on Chest X-Ray and how you would systematically analyse the X-Rays.
Sources
Image 1:Mikael Häggström, CC0, via Wikimedia Commons
Disclaimer


